XJ6R – Airbag Module Output Signals Uncovered

Airbag Module Output Signals Uncovered

Following on from my previous post on the airbag warning message, I did some testing of the Air bag Module (ABM) today.  I identified the correct output signal that the Instrument panel expects following a “power on” of the ignition system. First, I used the original, yellow sheathed Airbag wiring loom and some resistors to fake the existence of Airbags. It turns out that the steering wheel Airbag reads approximately 1.2 ohms when in good condition.

WARNING!
Please be very careful when doing anything with “live” Airbags, they are dangerous hence I used resistors instead.
  Please, Please view any one of a number of videos available on the subject at the well known online video site prior to connecting anything electrical to an Airbag. If you do not know what you are doing, get someone who does. I  suggest you do not touch them at all. I have measured mine so you don’t have too. Just keep them locked away somewhere safe or dispose of them safely.  Do not come back to me of one goes off accidentally, you have been warned!

I did not have any 1.2R resistors. I ended up using four 6R resistors in parallel and just pushed them into the appropriate plug in the loom. It took a little debugging to stop the Airbag module from buzzing an error code. Once I had the rig working, I could see what the output signal should be in normal operation. The issue I had was that the Safing module does not have a separate wire for its ground connection. It relies on the connection to the chassis via the mounting bolts. As I had the module sitting on a wooden panel, I needed to provide it with a separate ground to get it working.
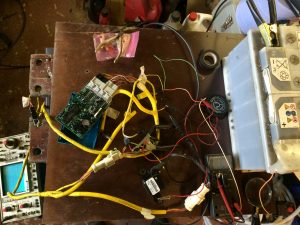
Airbag Module test rig
Airbag Module Test Rig

As expected, it turns out that although the circuit diagram says Ground and +B as the active/inactive conditions the reality is a little more complex than that.

  • With power permanently applied to the module the output signal is +B
  • Turn on the ignition power and the signal drops to ground for approximately 10 seconds
    • This is the Self test Pass signal “sequence” I was unaware of prior to this test
  • After that, the signal returns to +B and remains there unless an error is identified
  • I did try disconnecting the resistor packs (pretending to be the Airbags) one at a time and the signal goes from high to low as follows:
    • 3 times high to low
    • A short pause at high
    • Followed by either two or three high to low again depending on which “airbag” (actually a resistor pack) was disconnected
    • It then repeats the sequence again until the problem is resolved
    • This, I presume, equates to error codes 32 or 33 which is similar to the way the error code was displayed by the ABS module on my old XJS. It flashed the ABS light on the dashboard after you shorted a couple of pins together on the ABS module

The question is now, do I generate the same signals using just a few components or do I hard wire the required signals and use the Airbag module?

Debugging the Transmission MIL light

Having identified the requirements to resolve the AIRBAG warning on the digital display.  It was time to look into the Transmission MIL light issue. First there was the connection of the transmission loom to the transmission control module. I removed the panel below the gear leaver assembly which enabled me to push the transmission wiring connectors through a hole in the tunnel and connect up to the  transmission module.  The transmission error light was still taunting me! I did a slight tidy up of the wiring and re-connection of the Transmission module ground but still had the error. A little more debugging and discovered that I had not connected the permanent power feed to the transmission control module. I connected this up to the appropriate permanent feed, the MIL light went away.

Another problem resolved 😉
ABM Decision made

XJ6R – Airbag warning debugging

Airbag warning debugging

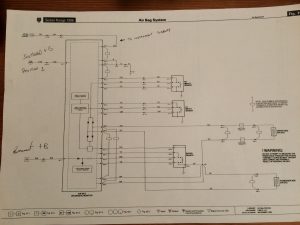
This post follows on from the last post where I explained the issue I was having when attempting to use the digital display from the XJR6. The display was showing the mileage then FLUID and AIRBAG messages. Having shorted the appropriate input to ground for the engine coolant sensor the FLUID message went away leaving me with the AIRBAG message to resolve. I tried shorting to ground or +B on the appropriate input but nothing seemed to clear the message. A photo of the Airbag circuit diagram is below, click for a larger version.

oldr 593

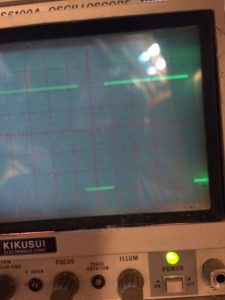
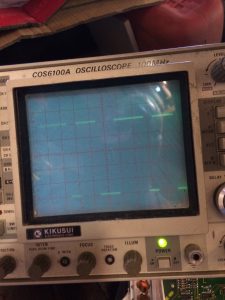
Since that time I have done a little more debugging. I proved that the feed to the main processor in the instrument circuit was receiving different signals depending on the status of the signal that should come from the Airbag Module. The Instrument display circuit, therefore appears to be receiving the appropriate signals to turn off the error message but it is not. The signals on the “Y” output of the HC151 chips looked like below with the signal grounded or at +B so you can see there is a difference and it was being propagated through the circuit board.

Signal with input high
Signal with input low
Signal with input low (airbag failure light should be off)

A little more research showed that there is potentially an error message generated due to “No diagnostic module selftest Pass signal”. Does that mean that there is a short signal sequence that is emitted from the Airbag module after power on that the Instrument circuit is expecting? There is no clock signal synchronization between the two modules so it has to be pretty basic pattern. I suspect something like a high signal initially and then low for maybe a second or two in each state. I really don’t want to have to add the Airbag module into the car. Using a test rig is needed to see if I can work out the signal states for the Airbag module in normal operation. Hopefully a very simple workaround can be found other than actually adding yet another module into the car ;-(


Airbag error codes
Airbag error codes

The Airbag module has a single output signal (Airbag Failure Warning, connector AB1, pin 4). The manual states this is either ground or +B.  It does not have any other connections to the CAN bus or directly to any other module. The only connections are to the two impact sensors, the Safing sensor and the airbags themselves. Doing a little research, it appears that Airbags have a resistance of around 2-3 Ohms each. This should be replicated rather than actually connecting the Airbags to the module along with the potential safety implications! I still have the full Airbag system wiring loom along with one of the impact sensors and the Safing module. I will use this as the test setup and fake the actual airbag connections to identify what the “Selftest Pass” signal looks like.

This will dictate one of three possible outcomes:

  1.  Replaced the module by a very basic circuit to replicate the required initial signal(s) required to stop the error message
  2. I will fit the Airbag module in the car just to eradicate the error message and allow the use of the XJR6 digital milometer
  3. I will not use the digital display from the XJR6 to provide a milometer and use something else like a GPS based milometer instead.

Next post when I have solved it or given up!

Le Mans Classic 2016

Le Mans Classic 2016

I spent the last few days at the Le Mans Classic event. It is a great event and I actually prefer it over the real 24h race.

The journey really starts to get interesting as soon as you get near a ferry port or the channel tunnel. All sorts of classic cars on the roads eventually arriving and producing great views at the waiting areas to board.

IMG_2705 IMG_2704 IMG_2703

Then there is a quick look around on the ferry followed by the tedious crossing.

Stops for Fuel and the obligatory nature breaks on the way

IMG_2709 IMG_2708 IMG_2707

But once you are there things really get good!

Loved this Buick and Caravan

Then just a mixture of pictures and short videos for your enjoyment

IMG_2731 IMG_2732

There was a brief flyby by a vintage fighter or two. This I think was a spitfire. The smoke traces it left behind had a life of their own!


IMG_2763


IMG_2773 IMG_2777 IMG_2776 IMG_2775 IMG_2780 IMG_2779 IMG_2785 IMG_2784 IMG_2782 IMG_2791 IMG_2790 IMG_2788 IMG_2786

Loved these transporters all in fantastic condition

IMG_2796 IMG_2795 IMG_2794 IMG_2793 IMG_2792

Group C’s kept on their own – don’t know what happened to the Jaguar though 🙁

IMG_2801 IMG_2800 IMG_2799 IMG_2798 IMG_2797 IMG_2806 IMG_2805 IMG_2804 IMG_2803 IMG_2802 IMG_2807

Return Ferry car park

IMG_2828 IMG_2827

Amazing church in Dieppe. Went and had a quick look around it and one of the Volunteers was really knowledgeable. Kept us talking so much we were almost last to check in!

Amazing church